Laman

More Payment Options in Android Market

[This post is by Eric Chu, Android Developer Ecosystem. —Dirk Dougherty]


A key to a great purchasing experience is providing users with simple and fast payment methods. The Android Market team has been working hard to deliver more forms of payment to further reduce purchase friction.


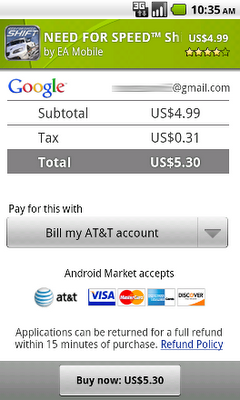
Today, I am pleased to announce the availability of AT&T Direct Carrier Billing for Android users on the AT&T network. AT&T Android users can now easily charge their Android Market purchases to their monthly accounts with only a few clicks. With the combination of Android Market’s new app discovery features and a carrier-backed frictionless payment method, users will find it significantly easier to discover and purchase applications of their choice.


We’ve been rolling out Direct Carrier Billing to all AT&T users over the past several days, as part of a general update to the Market service. Also in the update, please watch for the arrival of new features we announced recently, including the 15-minute refund window, dynamic Wallpaper and Widget categories, new 50MB max .apk size, and more. In addition, we’ve added even more categories to make it easier to find great apps in popular categories, such as “Media & Video”, “Music & Audio”, “Business”, “Sports” (in "Games"), and more. If you have one or more published apps on Android Market, please take a look at these new categories and decide if they are more suitable for your products.


We strongly believe carrier billing is a great way to make it easy for users to purchase and pay for applications. In addition to the availability of AT&T and T-Mobile US carrier billing, we’ll continue to partner with more carriers to offer carrier billing options for their subscribers.


2010 has been an awesome year for Android due in large part to your support. We have seen tremendous growth in Android Market both in terms of application volume and quality. In 2011, we remain committed to making Android Market the best mobile application store possible. As always, please don’t hesitate to continue giving us feedback through Market Help Center.


Best wishes for the new year!

It’s not “rooting”, it’s openness

[This post is by Nick Kralevich, an engineer on the Android Security Team. — Tim Bray]

“Nexus S has been rooted, let the madness commence!” proclaims Engadget. “This is only possible because Android's security is crap and it's exploited easily to gain root priviledges [sic]” adds a commenter.

You’ll have to excuse me if I strongly disagree.

The Nexus S, like the Nexus One before it, is designed to allow enthusiasts to install custom operating systems. Allowing your own boot image on a pure Nexus S is as simple as running fastboot oem unlock. It should be no surprise that modifying the operating system can give you root access to your phone. Hopefully that’s just the beginning of the changes you might make.

Legitimately gaining root access to your device is a far cry from most rooting exploits. Traditional rooting attacks are typically performed by exploiting an unpatched security hole on the device. Rooting is not a feature of a device; rather, it is the active exploitation of a known security hole.

Android has a strong security strategy, backed by a solid implementation. By default, all Android applications are sandboxed from each other, helping to ensure that a malicious or buggy application cannot interfere with another. All applications are required to declare the permissions they use, ensuring the user is in control of the information they share. And yes, we aggressively fix known security holes, including those that can be used for rooting. Our peers in the security community have recognized our contribution to mobile security, and for that, we are extremely grateful.

Unfortunately, until carriers and manufacturers provide an easy method to legitimately unlock devices, there will be a natural tension between the rooting and security communities. We can only hope that carriers and manufacturers will recognize this, and not force users to choose between device openness and security. It’s possible to design unlocking techniques that protect the integrity of the mobile network, the rights of content providers, and the rights of application developers, while at the same time giving users choice. Users should demand no less.

Android Browser User-Agent Issues

[This post is by Bart Sears, who manages the Android Browser team. —Tim Bray]

This posting describes some issues when browsing websites with mobile variants using large-form-factor Android devices. This posting will be of interest both to OEMs (with recommendations on how to set the User Agent string for the device) and to web site designers/administrators (with recommendations on how to decide to provide either a mobile version, a desktop version, or a large-form-factor touch device version of the site).

Details

With the advent of Android devices with larger form factors, we’ve been evaluating the best way for web sites to provide a UI appropriate for the various Android devices that are now available to consumers. We have received feedback that consumers using larger-form-factor devices often prefer the “full” or “desktop” version of the site over the “mobile” version. Most websites providing “mobile” versions key off of the HTTP User-Agent header field to determine whether to provide the full site or a mobile version.

While large-form-factor Android devices could use “User Agent Spoofing” to provide a desktop User Agent in the HTTP header, we recommend against this. There may be site customizations needed for Android devices (for example changes in the way that mouseover is used) and the site would be unable to provide these customizations if it receives a spoofed User Agent that did not indicate that this was an Android device.

Currently, Android devices provide the following (in addition to standard info) in the User-Agent: "Android", a version number, a device name, a specific build, Webkit version info, and "Mobile". For example, Froyo on a Nexus One has the following User Agent:

Mozilla/5.0 (Linux; U; Android 2.2.1; en-us; Nexus One Build/FRG83) AppleWebKit/533.1 (KHTML, like Gecko) Version/4.0 Mobile Safari/533.1

The "Mobile" string in the User Agent indicates that this device would prefer a version of the website optimized for Mobile (small form factor devices), if available.

We recommend that manufactures of large-form-factor devices (where the user may prefer the standard web site over a mobile optimized version) remove "Mobile" from the User Agent (and keep the rest of the User Agent as currently implemented). Web sites can then key off "Mobile" in the User Agent to decide on which UI version to present to the device. So a large screen device running Froyo would have a User Agent similar to:

Mozilla/5.0 (Linux; U; Android 2.2.1; en-us; device Build/FRG83) AppleWebKit/533.1 (KHTML, like Gecko) Version/4.0 Safari/533.1

Where "device" would be replaced with the actual name of the new device. Sites can continue to use “Android” in the User Agent to optimize for Android specific features and can also key off of “Mobile” to determine which UI to present.

Analytics for Android Apps

[This post is by Alexander Lucas, an Android Developer Advocate bent on saving the world 5 minutes. —Tim Bray]

With the addition of custom variables to the Mobile Analytics SDK for Android, it strikes me as a good time to cover something many of you might not have known was possible — using Google Analytics to easily track app usage. Using the mobile SDK is a handy way to get real data on how users interact with your Android apps. So today I'm going to explain how to track usage of your application with Google Analytics.

Prereqs Ahoy!

Before you take off running with this shiny new toy, there’s a few things you’ll need to set up first:

  • Download the mobile SDK. Download and installation instructions are available in the getting started section of the Mobile SDK docs, but the summarized version is:

    • Download the zip file from the download page

    • Put the libGoogleAnalytics.jar file in your project’s /libs directory

    • Be sure the following lines are in your AndroidManifest.XML file:
      <uses-permission android:name="android.permission.INTERNET" />
      <uses-permission android:name="android.permission.ACCESS_NETWORK_STATE" />

  • You’re going to need a Google Analytics account. Go to google.com/analytics and set up an account if you don’t already have one. Then set up a profile for your Android application. When you’re done you’ll see a javascript snippet to insert into your “site”. Copy the part that looks like UA-XXXXXXX-X. You’ll use this in the Android application to tell Analytics which profile the data is being sent for.

Get Tracking

Previous Google Analytics users are going to find a lot of this familiar. In fact, we’ve made a point of keeping the interface as familiar as possible.

First, get your tracker object, and initialize it using the UA code for the Analytics profile you want to track. It makes the most sense to do this in the onCreate() method for your activity main, so it only fires when your application starts up.

GoogleAnalyticsTracker tracker;
protected void onCreate(Bundle savedInstanceState) {
...
tracker = GoogleAnalyticsTracker.getInstance();
tracker.start(“UA-1234-1”, this);

}

The mobile SDK provides support for the 3 main types of data sent to the Google Analytics servers: Pageviews, events, and custom variables.

Pageviews

A pageview is a standard means to measure traffic volume to a traditional website. Given that this is going into an Android app and not a website, it’s going to be up to you to decide what a “pageview” means. Depending on the type of app, each Activity or different views within the same activity (for instance, different tabs within a TabActivity) could count as a pageview.

Whenever you want to trigger a pageview, call the trackPageView() method. It only takes one parameter, the URL you want a pageview counted towards.

tracker.trackPageView("/HomeScreen");

Pageviews make the most sense as full screen transitions, which in most cases will mean “one pageview per Activity.” Therefor it makes the most sense to put the call to trackPageView in the onCreate() method for each activity in your application. An exception would be if you were using a TabActivity, or other scenario where there were multiple full-screen transitions which all occurred within the same Activity, and conceptually mapped to seperate full-screen “pages” being viewed.

Events

In Analytics, events are designed to track user interaction to that doesn’t map to pageviews, like hitting play/pause/stop in a multimedia app. This maps very well to Android usage — Any form of interaction, from hitting certain buttons to adding/removing data from the datastore, can be tracked using Events.

Events are a little more complicated than pageviews, but just slightly. Instead of 1 parameter, you have 4: Category, Action, Label (optional), Value (optional).

To see how to make use of these, let’s imagine you had a media player application, and wanted to track how many times play, pause, and stop were clicked. The code would look like this:

   playButton.setOnClickListener(new OnClickListener() {
@Override
public void onClick(View v) {
...
tracker.trackEvent(
"Media Player", // Category
"Click", // Action
"Play", // Label
0); // Value
}
});

pauseButton.setOnClickListener(new OnClickListener() {
@Override
public void onClick(View v) {
...
tracker.trackEvent(
"Media Player", // Category
"Click", // Action
"Pause", // Label
0); // Value
});

stopEventButton.setOnClickListener(new OnClickListener() {
@Override
public void onClick(View v) {
...
tracker.trackEvent(
"Media Player", // Category
"Click", // Action
"Stop", // Label
currentVideo.getPositionInSeconds()); // Value
});

myMediaPlayer.setFinishedListener(new FinishedListener() {
@Override
public void onFinished(View v) {
...
tracker.trackEvent(
"Media Player", // Category
"Video Finished", // Action
"Stop", // Label
currentVideo.getLengthInSeconds()); // Value
});

Remember that in the Google Analytics web interface, this data is displayed hierarchically — For instance, if you click on Categories in the left nav, and then on “Media Player”, you’ll see a list of all the different possible values of “Action” which have happened in the “media Player” category. Clicking on “Click” will show all the labels which were sent in the Media Player category with an action of “Click”.

The 4th parameter, “value”, is optional, and behaves differently from the others. It’s meant to be cumulative; In this example, I’m sending the amount of video watched when a video is either stopped or allowed to finish. This is aggregated server-side, and when I go to look at my data I’ll be able to see the total time people have spent watching videos using my application.

Custom Variables

The new hotness! Custom variables are name-value pair tags that you can insert in your tracking code in order to refine Google Analytics tracking. The easiest way to think of this is as meta-data accompanying your pageviews and events. Using this metadata, it becomes easy to split off and look at segments of your data, much the same way you use labels in Gmail. One Android-specific example would be to have a “AppType” status with “Full” or “Lite” depending on whether the user has the full version of the app or not. You could then use the Analytics web interface to look at only the “Lite” users, and see how their usage / userbase differs from the “Full” segment. Custom variables are a ridiculously powerful analytical tool, but they’re also a deep topic. I heartily recommend giving the docs a once-through before implementing them in your Android application. Especially make sure to read the section on scoping. Twice. I’m mean it... I’ll wait.

There are 4 parameters in a custom variable: Index (1 to 5 inclusive), Name, Value, and Scope (Optional, defaults to Page Scope).

The place in your code where setCustomVar() will be called depends largely on what scope that variable will be:

  • Visitor scope: Call once the first time your application is run on a device. Don’t create any custom variables at the same index, or they will overwrite the first one. Useful for sending data about which version of the app is being used, what kind of phone, lite vs full version of the app, or anything that won’t change during the lifetime of the installation of that application.

  • Session scope: Call once at the beginning of every Activity startup. Will apply to all pageviews and events for the lifecycle of the activity, unless a different custom variable is created at the same index.

  • Page scope: Call right before trackEvent or trackPageView that the custom variable should apply to, every time that method is called. If no scope is specified, this is the default.

The call to set a custom variable will look like the following:

// Scopes are encoded to integers:  Visitor=1, Session=2, Page=3
tracker.setCustomVar(1, "Navigation type", "Button click", 3);

Choose a Dispatch Mode

In order to optimize for battery life, a request isn’t actually sent out to the server every time you fire a pageview or custom variable. Instead, all the pageviews, events, and their associated custom variables are stored in a local SQLITE database until they’re dispatched as a group to the server. You can set this up to happen one of two ways: Either have the dispatch occur automatically every n seconds, or manually when you call “dispatch” in code. The mode is chosen when you call the start method on your tracker.

Manual dispatch looks like this:

// No time increment sent as a parameter
tracker.start(“UA-1234-1”, this);

// Call this when you want to send the entire event queue to the server
tracker.dispatch();

The timed automatic dispatch looks similar, but sends an extra parameter (the number of seconds between dispatches). In timed dispatch, you never have to manually call dispatch.

// Dispatch all queued pagevies/events every 300 seconds (5 minutes)
tracker.start("UA-YOUR-ACCOUNT-HERE", 300, this);

It’s important to remember that Google Analytics uses the timestamp for when it receives your data, not when the actual pageview/event occurred. This can potentially lead to inaccurate Analytics data, since events can be sent on different days than when they occurred, so take care to dispatch regularly.

The end result

Let’s go back to that onCreate() method we used to instantiate the tracker earlier, and see what it looks like with all the pieces in place:

GoogleAnalyticsTracker tracker;

protected void onCreate(Bundle savedInstanceState) {
super.onCreate(savedInstanceState);

tracker = GoogleAnalyticsTracker.getInstance();
tracker.start(“UA-1234-1”, this);

if(isFirstTimeRunningApplication()) {
tracker.setCustomVar(1, “App Type”, “Demo”, 1);
}
tracker.trackPageView("/HomeScreen");


}

How to look at all this data

There are two ways you can approach this. First, Google Analytics has a pretty snazzy web interface, which does a very good job of surfacing useful information for you. If you’re new to Analytics and don’t really know what you’re looking for yet, the web interface is a great way to explore your data and understand your users.

If you already have a strong idea of the questions you want to ask (app usage across versions of the Android platform, growth rates, time-in-app per demo user vs full user, how many people beat level 3 on their first try, etc), and just want to automate the asking, Google Analytics also has a swanky data export API, with client libraries to facilitate the querying of your data in Java, Python, JavaScript, and C#.

Abiding by the TOS

Google Analytics comes with its own TOS, and it’s important to read and abide by it. The important bit, especially since this will be used inside Android applications, is that you cannot send personally identifying information to Analytics servers. This is a big deal. It means, for instance, that a visitor-level custom variable cannot contain a phone number, first name, or email address. Less intuitively, but still important, it means that if this application is a client to a web application (say, CRM software or a shopping site), you also cannot store information in Analytics which can be combined with your own backend software to identify the user, such as user ID or a transaction ID identical to the one stored on your web backend.
New Gingerbread API: StrictMode

[This post is by Brad Fitzpatrick, an Android Software Engineer who worries unreasonably about responsiveness. —Tim Bray]

Back Story

One great thing about Google is “20% time”: spending 20% of your time working on projects outside your main focus area. When I joined Google, I bounced all over the place, often joking that I had seven 20% projects. One project I kept coming back to was Android. I loved its open nature, giving me access to do whatever I wanted, including opening my garage door when I approached my house on my motorcycle. I really wanted it to succeed but I worried about one thing: It wasn’t always super smooth. Animations would sometimes stutter and UI elements weren’t always immediately responsive to input. It was pretty obvious that things were sometimes happening on the wrong thread.

As a heavy SMS user, one of my 20% projects during the Cupcake (Android 1.5) release was speeding up the Messaging app and making it feel smoother. I got the app to a happy state and then continued bouncing between other 20% projects. When the Donut (Android 1.6) release came out, I noticed that a few of my Messaging optimizations had been accidentally broken. I was sad for a bit but then I realized what Android really needed was always-on, built-in, pervasive performance monitoring.

I joined the Android team full-time just over a year ago and spent a lot of time investigating Froyo performance issues, in particular debugging ANRs (those annoying dialogs you get when an application stalls its main thread’s Looper). Debugging ANRs with the tools at hand was painful and boring. There wasn’t enough instrumentation to find the causes, especially when multiple processes were involved (doing Binder or ContentResolver operations to Services or ContentProviders in other processes). There had to be a better way to track down latency hiccups and ANRs...

Enter StrictMode

“I see you were doing 120 ms in a 16 ms zone...”

StrictMode is a new API in Gingerbread which primarily lets you set a policy on a thread declaring what you’re not allowed to do on that thread, and what the penalty is if you violate the policy. Implementation-wise, this policy is simply a thread-local integer bitmask.

By default everything is allowed and it won’t get in your way unless you want it to. The flags you can enable in the thread policy include:

  • detect disk writes

  • detect disk reads

  • detect network usage

  • on a violation: log

  • on a violation: crash

  • on a violation: dropbox

  • on a violation: show an annoying dialog

In addition, StrictMode has about a dozen hooks around most of the places that hit the disk (in java.io.*, android.database.sqlite.*, etc) and network (java.net.*) which check the current thread’s policy, reacting as you’ve asked.

StrictMode’s powerful part is that the per-thread policies are propagated whenever Binder IPC calls are made to other Services or Providers, and stack traces are stitched together across any number of processes.

Nobody wants to be slow

You might know all the places where your app does disk I/O, but do you know all the places where the system services and providers do? I don’t. I’m learning, but it’s a lot of code. We’re continually working to clarify performance implications in the SDK docs, but I usually rely on StrictMode to help catch calls that inadvertently hit the disk.

Background on disks on phones

Wait, what’s wrong with hitting the disk? Android devices are all running flash memory, right? That’s like a super-fast SSD with no moving parts? I shouldn’t have to care? Unfortunately, you do.

You can’t depend on the flash components or filesystems used in most Android devices to be consistently fast. The YAFFS filesystem used on many Android devices, for instance, has a global lock around all its operations. Only one disk operation can be in-flight across the entire device. Even a simple “stat” operation can take quite a while if you are unlucky. Other devices with more traditional block device-based filesystems still occasionally suffer when the block rotation layer decides to garbage collect and do some slow internal flash erase operations. (For some good geeky background reading, see lwn.net/Articles/353411)

The take-away is that the “disk” (or filesystem) on mobile devices is usually fast, but the 90th percentile latencies are often quite poor. Also, most filesystems slow down quite a bit as they get more full. (See slides from Google I/O Zippy Android apps talk, linked off code.google.com/p/zippy-android)

The “main” Thread

Android callbacks and lifecycle events all typically happen on the main thread (aka “UI thread”). This makes life easier most of the time, but it’s also something you need to be careful of because all animations, scrolls, and flings process their animations by callbacks on the main thread.

If you want to run an animation at 60 fps and an input event comes in (also on the main thread), you have 16 ms to run your code reacting to that input event. If you take longer than 16 ms, perhaps by writing to disk, you’ve now stuttered your animation. Disk reads are often better, but they can also take longer than 16 ms, especially on YAFFS if you’re waiting for the filesystem lock that’s held by a process in the middle of a write.

The network is especially slow and inconsistent, so you should never do network requests on your main thread. In fact, in the upcoming Honeycomb release we’ve made network requests on the main thread a fatal error, unless your app is targeting an API version before Honeycomb. So if you want to get ready for the Honeycomb SDK, make sure you’re never doing network requests on your UI thread. (see “Tips on being smooth” below.)

Enabling StrictMode

The recommended way to use StrictMode is to turn it on during development, learn from it, and turn it off before you ship your app.

For example, in your application or component’s onCreate():

 public void onCreate() {
if (DEVELOPER_MODE) {
StrictMode.setThreadPolicy(new StrictMode.ThreadPolicy.Builder()
.detectDiskReads()
.detectDiskWrites()
.detectNetwork()
.penaltyLog()
.build());
}
super.onCreate();
}

Or, simply:

    public void onCreate() {
if (DEVELOPER_MODE) {
StrictMode.enableDefaults();
}
super.onCreate();
}

That latter form was specifically added so you can target pre-Gingerbread API versions but still easily enable StrictMode using reflection or other techniques. For instance, you could be targeting Donut (Android 1.6) but still use StrictMode if you’re testing on a Gingerbread device or emulator, as long as you use enough Reflection to call StrictMode.enableDefaults().

Watching StrictMode

If you’re using penaltyLog(), the default, just run adb logcat and watch the terminal output. Any violations will be logged to your console, slightly rate-limited for duplicate elimination.

If you want to get fancier, turn on penaltyDropbox() and they’ll be written to the DropBoxManager, where you can extract them later with
adb shell dumpsys dropbox data_app_strictmode --print

Tips on being smooth

In addition to Thread and java.util.concurrent.*, check out some of the Android APIs such as Handler, AsyncTask, AsyncQueryHandler, and IntentService.

Our Experience

During Android development we have a new “dogfood” build each day that the whole team uses. Throughout the development of Gingerbread we set up our daily dogfood builds to enable StrictMode logging and upload all found violations for analysis. Every hour a MapReduce job runs and produces an interactive report of all the event loop stalls, their stack traces (including cross-process ones), their latency percentiles, which processes/packages they appear in, etc.

Using the data from StrictMode we fixed hundreds of responsiveness bugs and animation glitches all across the board. We made performance optimizations in the Android core (e.g. system services and providers) so all apps on the system will benefit, as well as fixing up tons of app-specific issues (in both AOSP apps and Google apps). Even if you’re using Froyo today, the recent updates to GMail, Google Maps, and YouTube all benefited from StrictMode data collection gathered on Gingerbread devices.

Where we couldn’t automatically speed up the system, we instead added APIs to make certain patterns easier to do efficiently. For example, there is a new method SharedPreferences.Editor.apply(), which you should be using instead of commit() if you don’t need commit()’s return value. (It turns out almost nobody ever checks it.) You can even use reflection to conditionally use apply() vs. commit() depending on the user’s platform version.

Googlers who switched from Froyo to Gingerbread without seeing all the baby steps between were shocked at how much more responsive the system became. Our friends on the Chrome team then recently added something similar. Of course, StrictMode can’t take all the credit. The new concurrent garbage collector in Gingerbread also greatly reduces latency hiccups.

The Future

The StrictMode API and its capabilities will continue to expand. We have some good stuff lined up for StrictMode in Honeycomb but let us know what else you’d like to see! I’ll be answering questions on stackoverflow.com for questions tagged “strictmode”. Thanks!

Android Market Client Update

[This post is by Eric Chu, Android Developer Ecosystem. —Dirk Dougherty]

The Android Market engineering team has been hard at work on improving the Android Market experience for users and developers. Today, I’m pleased to announce a significant update to the Android Market client. Over the next two weeks, we’ll be rolling out a new Android Market client to all devices running Android 1.6 or higher.

This new Market client introduces important features that improve merchandising of applications, streamline the browse-to-purchase experience, and make it easier for developers to distribute their applications.

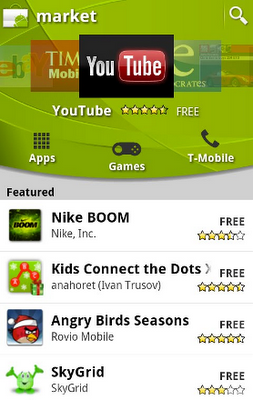
With a focus on improving discoverability and merchandising, we’ve introduced a new carousel on the home and category screens. Users can quickly flip through the carousel to view promoted applications and immediately go to the download page for the application they want. Developers have been very active in creating great Widgets and Live Wallpapers. To make it easier for users to find their favorites, we’re introducing two new categories for Widgets and Live Wallpapers. Applications that include Widgets and Wallpapers will be automatically added to those new categories. We’ll also be adding more categories for popular applications and games in the weeks ahead. In addition, the app details page now includes Related content, which makes it easier for users to quickly find apps of similar interest.


To streamline the browse-to-purchase experience, users can now access all the information about an application on a single page without the need to navigate across different tabs. We’re also introducing application content rating to provide users with more information about applications they are interested in. Since most users who request a refund do so within minutes of purchase, we will reduce the refund window on Market to 15 minutes. This change will be largely transparent to buyers, but will help developers manage their businesses more effectively.


To make it easier for developers to distribute and manage their products, we will introduce support for device targeting based on screen sizes and densities, as well as on GL texture compression formats. We are also increasing the maximum size for .apk files on Market to 50MB, to better support richer games.

With this release, we aimed to deliver features that are most requested by users and developers. However, we’re not done yet. We plan to continue to rapidly enhance Android Market for both users and developers and make it the best content distribution service for the Android ecosystem.

Please stay tuned as we continue to deliver new capabilities in the coming weeks and months.

Saving Data Safely

With the advent of Gingerbread, we’re going to be running a series of posts in this space about the aspects of Android 2.3 that developers should care about. One thing that developers should care about more than anything else is not losing data. The rules are changing slightly as Gingerbread arrives, so I thought that would be a good starting point. I didn’t write this; I pulled it together from the contents of an email thread involving Android engineers Brad Fitzpatrick, Dianne Hackborn, Brian Swetland, and Chris Tate.

The question is: how do you make really sure your data’s been written to persistent storage? The answer involves a low-level system call named fsync(). Old C programmers like me mostly learned this the hard way back in the Bad Old Days; in 2008 at OSCON I immensely enjoyed Eat My Data: How Everybody Gets File IO Wrong by Stewart Smith; I've included a picture I took of one of his slides.

The reason this should be of concern to Android developers is that with 2.3, an increasing proportion of devices, notably including the Nexus S, are going to be moving from YAFFS to the ext4 filesystem, which buffers much more aggressively; thus you need to be more assertive about making sure your data gets to permanent storage when you want it to.

If you just use SharedPreferences or SQLite, you can relax, because we’ve made sure they Do The Right Thing about buffering. But if you have your own on-disk format, keep in mind that your data doesn't actually consistently reach the flash chip when you write() it or even when you close() it. There are several layers of buffering between you and the hardware! And because of ext4 buffering policy, any POSIX guarantees that you thought you had before (but actually didn't), you especially don't have now.

Some Android devices are already running non-YAFFS filesystems, but as we brought up the Nexus S, buffering issues have actually bitten us a couple of times in framework code. When the Gingerbread source code becomes available, you’ll find lots of examples of how file I/O should be done.

To start with, for raw data consider using one of the synchronous modes of java.io.RandomAccessFile, which take care of calling fsync() for you in the appropriate way. If you can’t, you’ll want Java code that looks something like this.

     public static boolean sync(FileOutputStream stream) {
try {
if (stream != null) {
stream.getFD().sync();
}
return true;
} catch (IOException e) {
}
return false;

In some applications, you might even want to check the return status of the close() call.

Now of course, there are two sides to this story. When you call fsync() and force the data onto storage, that can be slow; worse, unpredictably slow. So be sure to call it when you need it, but be careful not to call it carelessly.

Background reading if you want to know more:

Android 2.3 Platform and Updated SDK Tools

Today we're announcing a new version of the Android platform — Android 2.3 (Gingerbread). It includes many new platform technologies and APIs to help developers create great apps. Some of the highlights include:

Enhancements for game development: To improve overall responsiveness, we’ve added a new concurrent garbage collector and optimized the platform’s overall event handling. We’ve also given developers native access to more parts of the system by exposing a broad set of native APIs. From native code, applications can now access input and sensor events, EGL/OpenGL ES, OpenSL ES, and assets, as well a new framework for managing lifecycle and windows. For precise motion processing, developers can use several new sensor types, including gyroscope.

Rich multimedia: To provide a great multimedia environment for games and other applications, we’ve added support for the new video formats VP8 and WebM, as well as support for AAC and AMR-wideband encoding. The platform also provides new audio effects such as reverb, equalization, headphone virtualization, and bass boost.

New forms of communication: The platform now includes support for front-facing camera, SIP/VOIP, and Near Field Communications (NFC), to let developers include new capabilities in their applications.

For a complete overview of what’s new in the platform, see the Android 2.3 Platform Highlights.

Alongside the new platform, we are releasing updates to the SDK Tools (r8), NDK, and ADT Plugin for Eclipse (8.0.0). New features include:

Simplified debug builds: Developers can easily generate debug packages without having to manually configure the application’s manifest, making workflow more efficient.

Integrated ProGuard support: ProGuard is now packaged with the SDK Tools. Developers can now obfuscate their code as an integrated part of a release build.

HierarchyViewer improvements: The HierarchyViewer tool includes an updated UI and is now accessible directly from the ADT Plugin.

Preview of new UI Builder: An early release of a new visual layout editor lets developers create layouts in ADT by dragging and dropping UI elements from contextual menus. It’s a work in progress and we intend to iterate quickly on it.

To get started developing or testing applications on Android 2.3, visit the Android Developers site for information about the Android 2.3 platform, the SDK Tools, the ADT Plugin and the new NDK.

Check out the video below to learn more about the new developer features in Android 2.3.